Monday, October 31, 2011

Alternative Plans to Wrap Up Halloween


For a family that wants to keep their distance from the spooky, creepy elements of Halloween, there are plenty of alternatives to still have fun and make smart choices.

 Treats and sweets can originate in your own kitchen and not just in the candy bag today.  Make an afternoon activity of baking fun by dipping apples or making popcorn balls.  Both are seasonal favorites that can be enjoyed during the preparation just as much as the consumption.  Give kids other hands-on options like frosting cupcakes or drizzling chocolate over pretzels that can result in simple, thoughtful treats for them to give to a neighbor to turn the day’s focus on getting on its head. 

 For a crafty project, get the family involved in prepping for the next holiday by arranging the table and buffet or other side tables for Thanksgiving.  A handful of small to medium pumpkins, clear glass vases, white pillar candles, and bags of candy corn can create a visually interesting, whimsical centerpiece.  Alternate the pumpkins and vases down the table’s center.  Place a 3 or 6 inch pillar candle in each vase.  Fill in the base of each vase 2 to 4 inches high with candy corn.  It’s that simple.  If you want to go a step further, scatter autumn leaves at the bases of the pumpkins and vases you cut from a craft store vine or swag.  Lay out some chargers and cloth napkins at each place, and you’re well on your way to hosting a turkey feast around your table, and you’ve gotten the kids forward-focused with a positive project.

Wrap up the evening with a family comedy movie night, perhaps accompanied by those popcorn balls for a sweet alternative to a movie’s best snack companion.  Whatever you choose to do with your day, enjoy it.  Tomorrow rounds out one of the last weekends before the hustle-and-bustle, travel, and family gatherings really pick up during the holiday season.  And unwrap more than just candy. 

 
DesignInMind column; appeared in the Valley Morning Star October 30th.


Tuesday, October 25, 2011

The Frames of Fall


To take fall décor up and beyond tabletop surfaces, you can use frames in creative ways to feature simple touches of the season.  Whether on the wall, situated on the mantel, or even suspended from the ceiling, picture frames can highlight more than treasured family photos.

Backless frames can be used in a variety of ways to construct appealing and uncomplicated displays to showcase any theme of your choice.  For autumn, use other elements like leaves, ribbon, acorns, pinecones, and craft supplies to put together structured collections.  Gather a few frames of varying sizes, keeping their exteriors similar – wood tones, metallics, or glossy acrylics.  Take individual faux fall leaves and space and affix them to a string of ribbon in a coordinating color or print.  You can use hot glue, needle and thread, or decorative tacks or pins.  Attach the ends of the ribbon to each side of the frame by tying or tacking.  Do this for each of your frames, and then arrange them standing up on the mantel, foyer table, or buffet. 

 For another variation, tie narrow ribbon strands around acorns or pinecones, and suspend them from the top of the open frame.  Stagger the materials and heights to create a modern spin on the concept of mistletoe in a doorway on a smaller scale.  You can also take small craft foam balls, pin a ribbon end securely into the center, and glue on small leaves, dried beans, or ribbon pieces, completely covering the foam.  Hang these from a backless frame and either display as recommended above, or, to take it a step further, securely suspend your frame or frames from hooks you anchor into the ceiling over a dining table or fireplace.             

A little crafting know-how and a willingness to think essentially inside the box can provide quite an attractive finished product.  Add some structure to textured pieces that represent the season with ease, and you will have a collection fully fit for display in the frames of fall.  

DesignInMind column; appeared in the Valley Morning Star October 23rd.

Tuesday, October 18, 2011

Pumpkin Painting

Pumpkin carving is classic, and pumpkin painting could be a modern variation of the trend of using decorated pumpkins in fall displays. Without cutting in to the pumpkin to create your design, you also get more longevity out of your seasonal centerpiece. With a few simple supplies, you can have a finished product worthy of the spotlight.

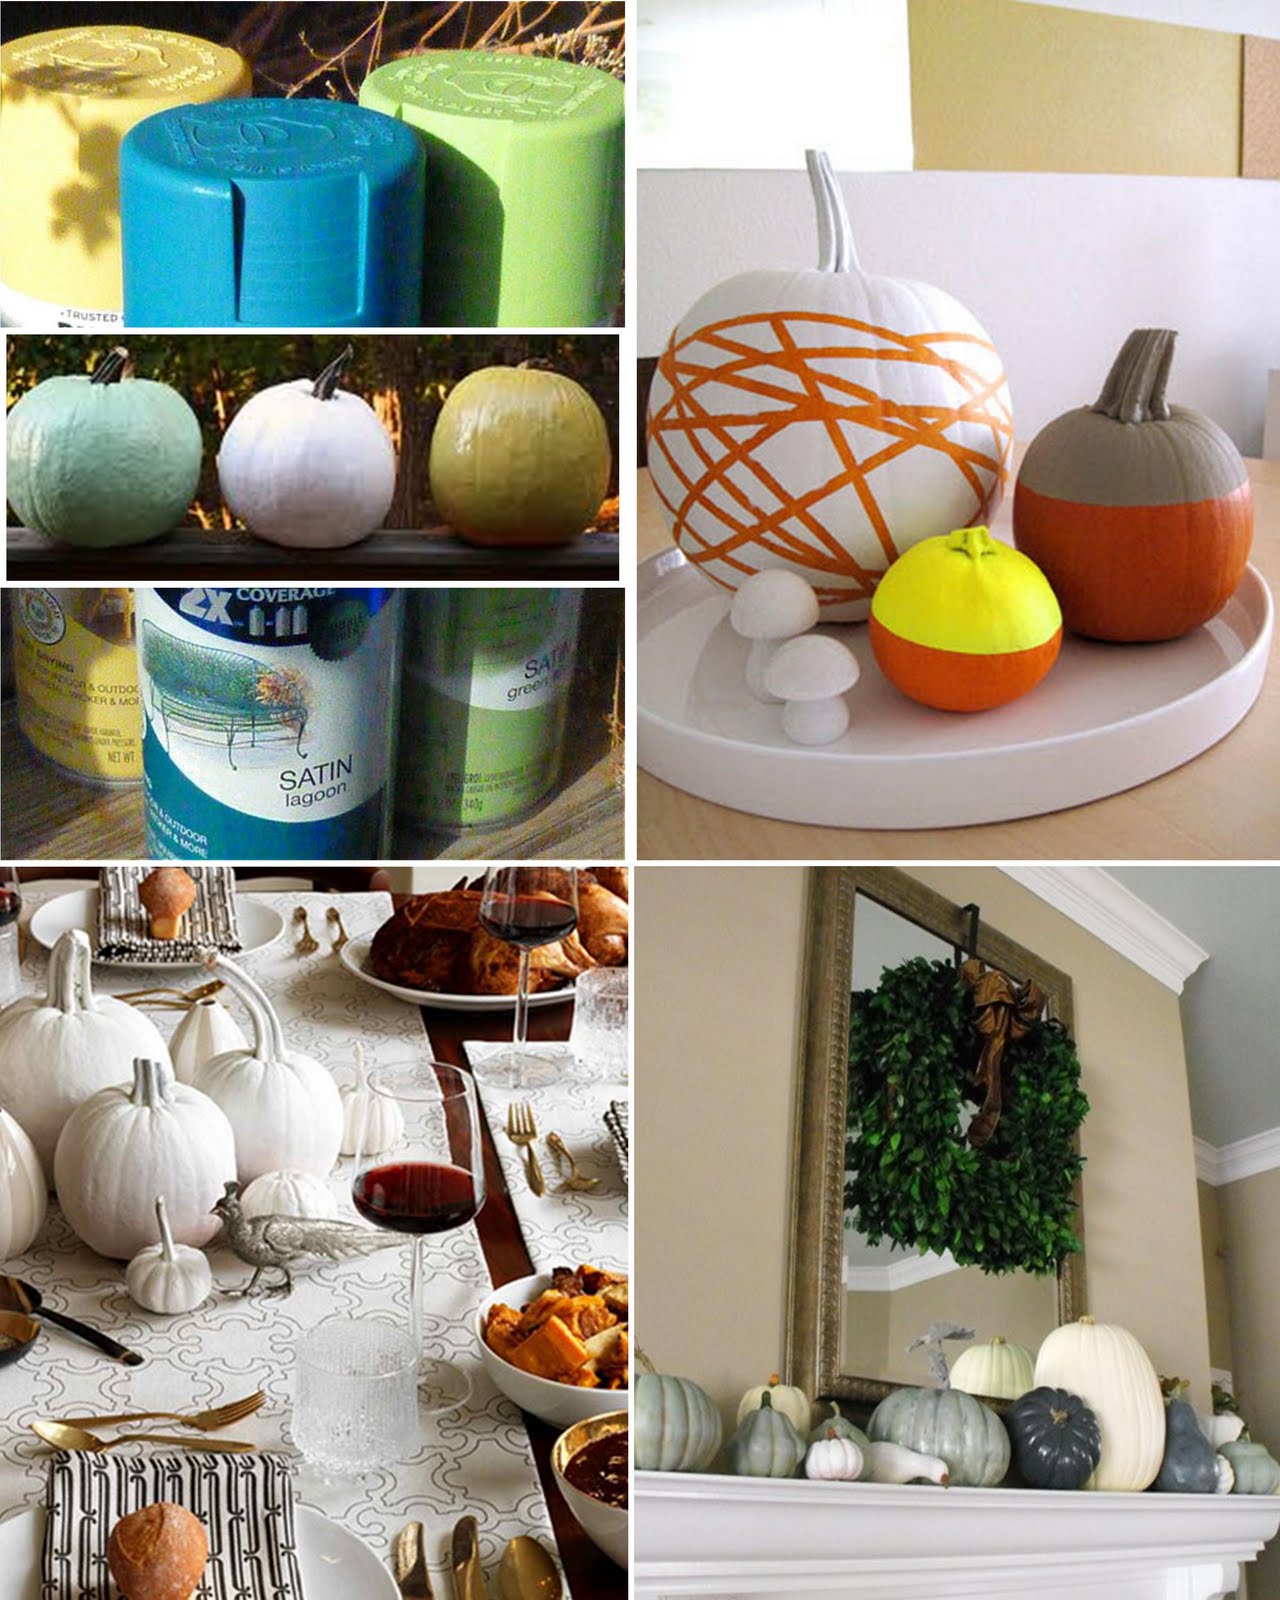
Pick some pumpkins of varying shapes and sizes for the most visually appealing mix. Whether short and plump or tall and slender, each pumpkin can lend itself to a charming design. You will need some spray paint in the color or colors of your choice. I feel a monochromatic look or a mix of two complimentary shades will look the most cohesive. Consider paint colors that blend well with the pumpkin’s orange exterior like teal, aqua, hot pink, yellow, white, and a contemporary gray. Also pull together some painter’s tape, wide rubber bands, and recycled newspaper.

Spray painting outdoors is of course your best bet for ventilation and cleanliness. Stake some recycled newspaper in the yard to spray against as your canvas’s backdrop. Use the painter’s tape to tape off sections to not paint and keep the bright orange skin showing in your finished design. You could run a tape line across the middle of the pumpkin, cover the pumpkin’s top with extra newspaper, and tape that down over your first tape line. Spray the bottom half of the pumpkin with your desired spray paint color and allow it to dry completely according to the can’s instructions. Only remove your newspaper and tape lines once the paint is totally dry. Now you have a fresh half-and-half design. On a more slender pumpkin, wrap a handful of wide rubber bands around the body in an overlapping, sporadic fashion. Cover the stem completely in painter’s tape. Spray the pumpkin with paint and allow it to dry. When you remove the tape and rubber bands, you have just a few slices of orange showing through. Your options are really limitless with designs: stencils, stickers, and freehand application of painter’s tape could construct an array of styles.

One evening craft project could elicit weeks of head turning decorations to impress dinner guests and trick-or-treaters alike. Arrange your painted pumpkins as a centerpiece along the dining room table, buffet, foyer table, porch bench, or front steps. And consider pumpkin painting an early treat for yourself.

DesignInMind column; appeared in the Valley Morning Star October 16th.


Monday, October 10, 2011

Pumpkin Puree Soiree

We like to see pumpkins aplenty this time of year. And tasting them ranks pretty close to the top of the list as well. If you set aside the can opener, go for the gusto, and play with fresh pumpkins in the kitchen this month, you may find a whole new appreciation for how you can design this squash fruit to be more than an autumn staple.

Many pumpkin recipes can get started through baking whole pumpkins at home. It’s important to wash the exterior before cutting in. Carefully cut the pumpkin in half, slicing down through the top. Scrape out the fibers and seeds, leaving the smoother flesh. You can bake the halves or go on to quarter the pumpkin pieces, and lay them skin up on a baking pan. Bake at 400 degrees for about a half hour, or until the flesh is fork tender. Let the pieces cool, and then scoop away the flesh from the rind. To puree, add the pumpkin flesh into a food processor and blend until smooth. Now doesn’t that sound tastier than the canned version? Your fresh pumpkin puree can be used in your favorite pumpkin pie recipe to start. Or branch out and consider recipes for pumpkin pancakes, muffins, cake, or bread loaves. For more variety, cream cheese, marshmallow crème, cinnamon, and pumpkin puree combine to make a sweet seasonal dip.

Pumpkin soup can be a savory or sweet hot dish that puts a spin on the typical uses. Find recipes that call for ingredients like chicken broth, garlic, thyme, and sautéed onions, or take a different route with heavy cream, diced apples, brown sugar, and cinnamon. Add in your creation as a separate course for a weeknight dinner to make it anything but an ordinary weeknight dinner.

Leave the can opener in the drawer, pull out the baking dishes, and draw on the spice notes of the season to whip up some rich and flavorful specials to serve for any meal, brunch, or soiree you host for friends and family.

DesignInMind column; appeared in the Valley Morning Star October 9th.

Monday, October 3, 2011

Fall at Your Front Door

October has arrived, and holiday guests knocking at your front door is just weeks away. Beyond sprucing up your dinner table with some seasonal touches, dress your front stoop to be inviting and visually appealing with warm fall decorating ideas. Visitors will know they are in for more than a treat when they cross the threshold.

Simple and fitting, you cannot go wrong with a collection of pumpkins and mums. The bright blend of orange and yellow sets the tone for autumn appeal. Two larger, potted mums flanking your front door with a handful of pumpkins in varying sizes clustered around them is complete in minutes and will last for weeks. Now carving any pumpkins this early in the month will have you replacing them before four weeks are up. But you know we can always get more creative than that.

For the same effect without the mess, consider what paint can do on the exterior of pumpkins without taking a knife to them. Use a stencil, which you can print and cut out yourself, of your family’s monogram letter, and spray paint the sizeable letter on the largest pumpkin in your grouping. The same could be done with limitless designs, short sayings like “Welcome,” and graphics to suit your style. For a custom pumpkin collection, you could actually spray paint your entire pumpkins in one monochromatic selection or a couple of paint color choices, including light-catching metallics. There are more pumpkin painting ideas for indoors coming later this month!

In the process, do not neglect your front door itself. A wreath can be the crowning jewel to your entryway. You can purchase a ready-to-go wreath and hang it on a door hanger, or you can make your own for a custom look. Start with a plain dried naturals wreath, which is essentially a ring of tightly-woven, vine-like branches. Add on the decorations you want, using a glue gun for the most secure hold. Take all of the leaves off of a faux fall leaf garland, and glue them on individually in clusters. The same can be done with small acorns, gourds, sprigs of berries, or other fall trimmings.

Lay out a fresh welcome mat, and await that first knock or door bell ring that culminates in a compliment to your inviting entrance. You know that special holiday moments are right around the corner when you have fall literally at your front door.

DesignInMind column; appeared in the Valley Morning Star October 2nd.