Sunday, November 27, 2011

The Christmas Switch

Every family’s traditions differ for the weekend following Thanksgiving.  You may have spent your weekend continuing to entertain holiday guests, stood in line in the dark and waited patiently for the best shopping deals, or moved on to Christmas with a whirlwind of decorating.  Can you guess which of these I did?

The faux pumpkins are packed away, and all is merry and bright!  If your home now has decked halls and walls, you’re all set for a new month of winter cheer.  If Christmas decorating is on your to-do list, here are some thoughts about getting the ornaments rolling.

If your table centerpiece for fall was built around a series of glass vases, the winter season can be highlighted using the same foundation pieces with new accessories.  Swap out the tablecloth for a shade that goes with your Christmas theme.  Empty the glass vases and give them a good wash-and-dry.  Stagger them down the table’s center again, and fill with ornaments.  If your Christmas tree has taken on a new theme or color scheme in recent years, using your older ornament collection or keepsake ornaments within your tablescape is one way to keep them on display without hanging them on the tree.  Fill in around the vases with another layer of holiday accents, which could include small loose ornaments, mistletoe or holly sprigs, or even a sprinkling of faux snow from the craft store. 

Replace your fall chargers, napkins, and napkin rings with winter versions.  That could be as simple as going from gold to silver chargers, from chocolate brown to white cloth napkins, and from warm-toned metal rings to jingle bell napkin rings instead.  Take down your front door wreath and hang up a Christmas wreath that features bells, shatterproof ornaments, or seasonal ribbon strands.  Replace your guest bathroom hand towels with whimsical Christmas hand towels, and add a new bottle of winter pump soap alongside the sink.      

When your fall décor started with some easily-transitioning pieces, making the switch to Christmas can be as smooth as swapping out accessories.  This makes investing in decorating staples that much more worthwhile.  And it makes getting to that warm Christmas feeling that much simpler.  
 
 
DesignInMind column; appeared in the Valley Morning Star Sunday, November 27th.


My Christmas tablescape:


Monday, November 21, 2011

The Hostess Diary: Preparing for Gobble Day Guests

As your food preparations will really heat up in the next week, turn your attention now to prepping your home for your Thanksgiving guests.  If family is going to be taking up residence in your guest room, get a jump start on making their holiday stay as comfortable as your post-turkey nap. 

Start by making your space for guests feel like a space for guests.  If they will be sharing a room with an office space or craft area, pare down on what is on display that speaks to work and not rest.  Clear your desk, put away displayed supplies, and store as much as possible out of sight in storage boxes under the bed or on closet shelves.  If your guest closet is doing double duty as a whole-house storage space, provide your company with an over-the-door hook stocked with hangers to hang on the outside of the closet door for their clothes.  Clear drawer space and let them know they are welcome to unpack.  If there is no room for a dresser, add a folding suitcase stand like those provided in hotel rooms.

Consider all the comforts of home and more that you can provide to make their stay cozy and enjoyable.  Layer multiple weights of covers on the bed to suit a variety of temperature preferences.  Provide blankets and additional pillows in a trunk or chest at the foot of the bed.  Add a serving tray to the nightstand alongside a good reading lamp that holds a water pitcher and glasses, a clock, and a box of tissues.  Provide some seasonal magazines in a nearby basket for perusing before bed.        

Outfit the guest bathroom with hotel amenities.  Provide new shampoo and conditioner in the shower, along with some fragrant fall shower gel.  Clear a drawer for guest supplies like individually packaged toothbrushes, travel size toothpaste, new razors, cotton swabs, and other necessities like a small hairdryer.  Keep guest towels in plain view, along with easy access to replacement rolls of toilet paper and boxes of tissue.  Provide a basket designated for used towels, and transfer them to the laundry room frequently. 

It can be a combination of little touches that ensures your overnight guests know they were thought of and very welcome in your home for your collective Thanksgiving feast.  
 
 
DesignInMind column; appeared in the Valley Morning Star November 20th instead of November 13th.


Wednesday, November 16, 2011

Christmas Zazzle Designs


Get a jump on Christmas photo cards and stamps to send out next month!  Here is a peek at the different Christmas designs used in my holiday collection. 

Find your fit.  There is plenty of winter whimsy to go around.
My Gallery

Monday, November 7, 2011

Soften the Season with Feathers and Ribbon

To incorporate a range of materials into your fall tablescape and decorative groupings, merge some softer textures in with your sturdy fall standards.  Feathers and ribbon are two modern materials that can bring a supple touch and polished finished look.

Fill a vase with a large bundle of tall feathers in lieu of flowers or branches, placing it in the center of your dining table, on your side buffet or hutch, or on the coffee or end table.  Hang an alternative to a wreath made of leaves or vines by creating your own feather wreath.  Use a styrofoam wreath ring as your base, and hot glue layer upon layer of feathers, completely covering the base and fashioning a full and fluffy end result.  Add a peacock feather to each place setting by tucking one into each folded napkin or affix one to each place card for your family’s Thanksgiving feast. 

Use slim ribbon strands in a print, pattern, or shade that matches your table’s décor, and wrap them around mini pumpkins, gourds, large acorns, or pinecones.  Secure one end over the other with some double sided tape.  Fill a large glass pedestal bowl with your collection.  As an alternative to dressy napkin rings, tie a ribbon strand around your gathered cloth napkin at each place setting.  Or fold each napkin to create a pocket for your silverware, placing a napkin on the charger at each place setting, wrapping each in ribbon.  You could add a decorative embellishment to the center of the piece of ribbon like a button, small fall leaf, or dried berry using a spot of hot glue.  For a casual table runner, run different widths and patterns of ribbon down the center of the dining table.  You could also run cross sections of ribbon across the width of the table connecting the place settings across from each other, generating a stylish grid system.

Soften the season with feathers and ribbons to enhance your autumn style.  You may just find the smooth touches add another dimension to warm your home from your doorstep to your dining room.         

DesignInMind column; appeared in the Valley Morning Star November 6th.

Monday, October 31, 2011

Alternative Plans to Wrap Up Halloween


For a family that wants to keep their distance from the spooky, creepy elements of Halloween, there are plenty of alternatives to still have fun and make smart choices.

 Treats and sweets can originate in your own kitchen and not just in the candy bag today.  Make an afternoon activity of baking fun by dipping apples or making popcorn balls.  Both are seasonal favorites that can be enjoyed during the preparation just as much as the consumption.  Give kids other hands-on options like frosting cupcakes or drizzling chocolate over pretzels that can result in simple, thoughtful treats for them to give to a neighbor to turn the day’s focus on getting on its head. 

 For a crafty project, get the family involved in prepping for the next holiday by arranging the table and buffet or other side tables for Thanksgiving.  A handful of small to medium pumpkins, clear glass vases, white pillar candles, and bags of candy corn can create a visually interesting, whimsical centerpiece.  Alternate the pumpkins and vases down the table’s center.  Place a 3 or 6 inch pillar candle in each vase.  Fill in the base of each vase 2 to 4 inches high with candy corn.  It’s that simple.  If you want to go a step further, scatter autumn leaves at the bases of the pumpkins and vases you cut from a craft store vine or swag.  Lay out some chargers and cloth napkins at each place, and you’re well on your way to hosting a turkey feast around your table, and you’ve gotten the kids forward-focused with a positive project.

Wrap up the evening with a family comedy movie night, perhaps accompanied by those popcorn balls for a sweet alternative to a movie’s best snack companion.  Whatever you choose to do with your day, enjoy it.  Tomorrow rounds out one of the last weekends before the hustle-and-bustle, travel, and family gatherings really pick up during the holiday season.  And unwrap more than just candy. 

 
DesignInMind column; appeared in the Valley Morning Star October 30th.


Tuesday, October 25, 2011

The Frames of Fall


To take fall décor up and beyond tabletop surfaces, you can use frames in creative ways to feature simple touches of the season.  Whether on the wall, situated on the mantel, or even suspended from the ceiling, picture frames can highlight more than treasured family photos.

Backless frames can be used in a variety of ways to construct appealing and uncomplicated displays to showcase any theme of your choice.  For autumn, use other elements like leaves, ribbon, acorns, pinecones, and craft supplies to put together structured collections.  Gather a few frames of varying sizes, keeping their exteriors similar – wood tones, metallics, or glossy acrylics.  Take individual faux fall leaves and space and affix them to a string of ribbon in a coordinating color or print.  You can use hot glue, needle and thread, or decorative tacks or pins.  Attach the ends of the ribbon to each side of the frame by tying or tacking.  Do this for each of your frames, and then arrange them standing up on the mantel, foyer table, or buffet. 

 For another variation, tie narrow ribbon strands around acorns or pinecones, and suspend them from the top of the open frame.  Stagger the materials and heights to create a modern spin on the concept of mistletoe in a doorway on a smaller scale.  You can also take small craft foam balls, pin a ribbon end securely into the center, and glue on small leaves, dried beans, or ribbon pieces, completely covering the foam.  Hang these from a backless frame and either display as recommended above, or, to take it a step further, securely suspend your frame or frames from hooks you anchor into the ceiling over a dining table or fireplace.             

A little crafting know-how and a willingness to think essentially inside the box can provide quite an attractive finished product.  Add some structure to textured pieces that represent the season with ease, and you will have a collection fully fit for display in the frames of fall.  

DesignInMind column; appeared in the Valley Morning Star October 23rd.

Tuesday, October 18, 2011

Pumpkin Painting

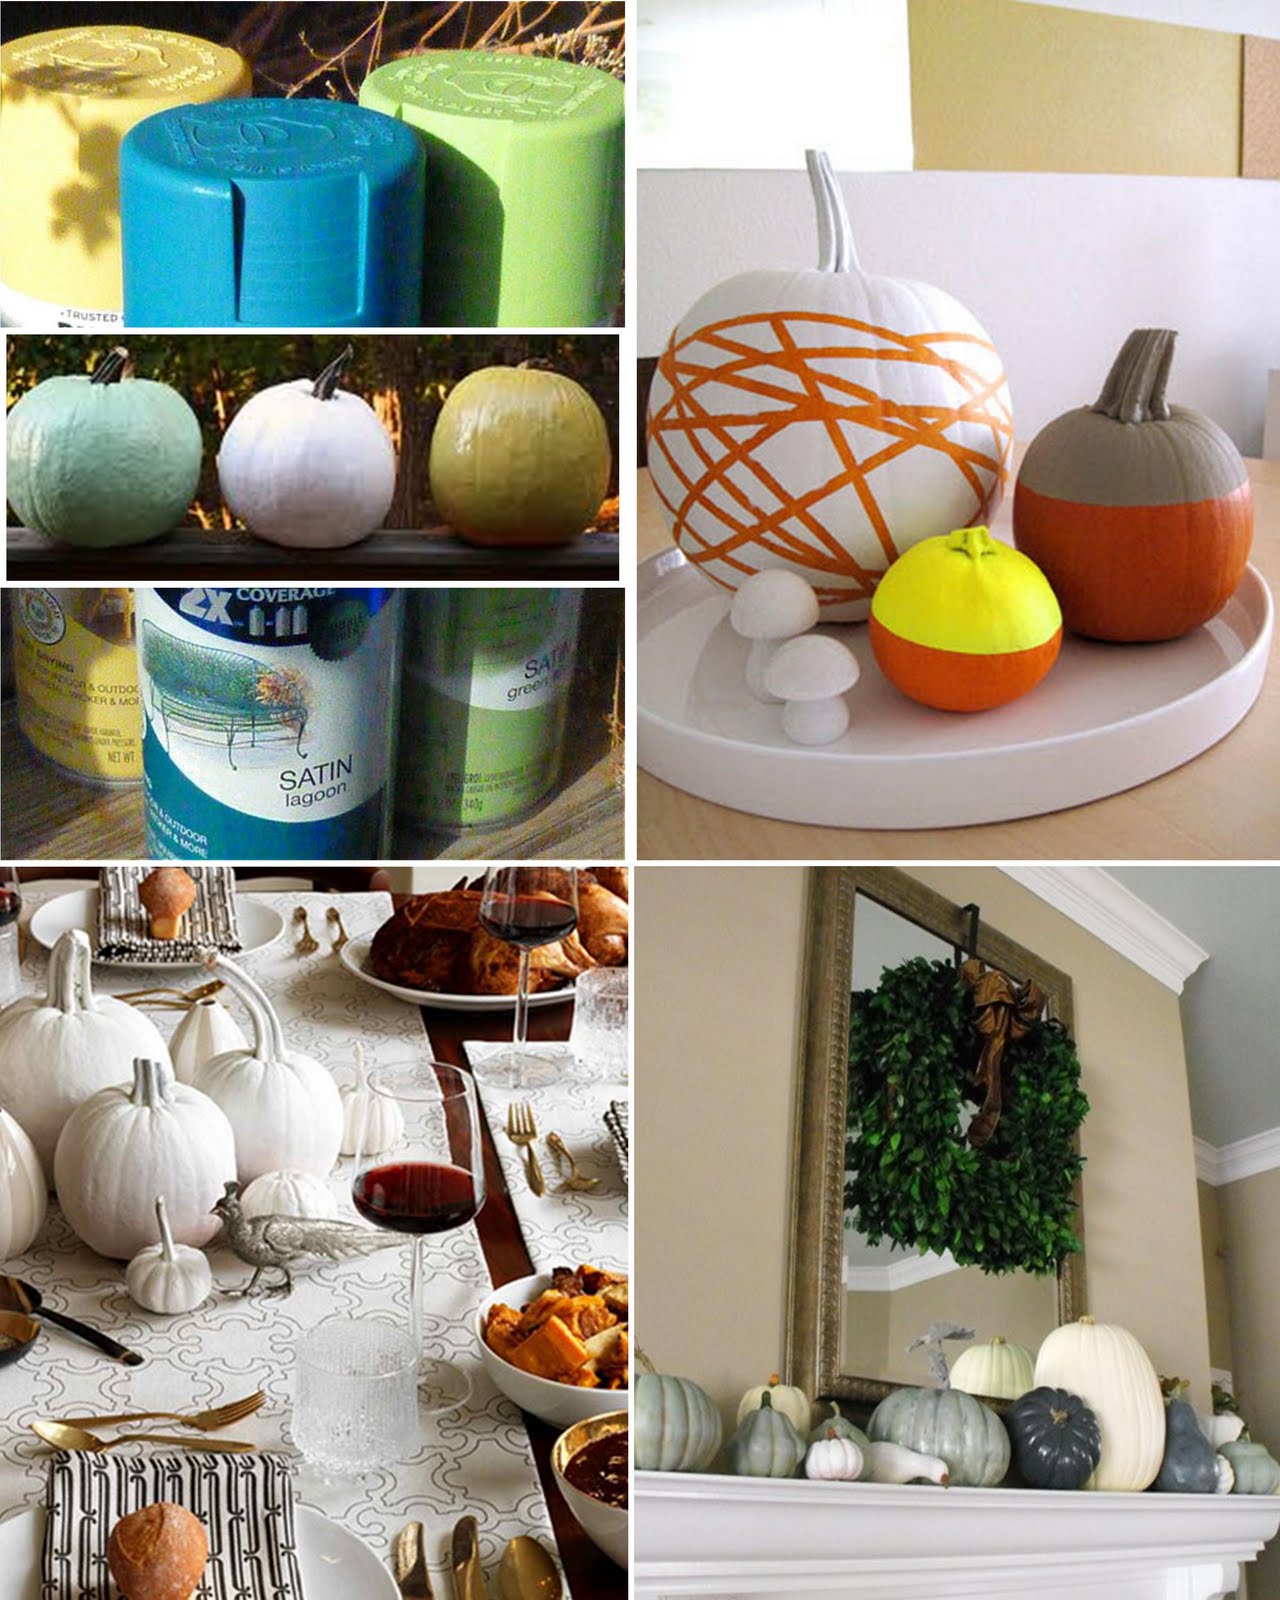
Pumpkin carving is classic, and pumpkin painting could be a modern variation of the trend of using decorated pumpkins in fall displays. Without cutting in to the pumpkin to create your design, you also get more longevity out of your seasonal centerpiece. With a few simple supplies, you can have a finished product worthy of the spotlight.

Pick some pumpkins of varying shapes and sizes for the most visually appealing mix. Whether short and plump or tall and slender, each pumpkin can lend itself to a charming design. You will need some spray paint in the color or colors of your choice. I feel a monochromatic look or a mix of two complimentary shades will look the most cohesive. Consider paint colors that blend well with the pumpkin’s orange exterior like teal, aqua, hot pink, yellow, white, and a contemporary gray. Also pull together some painter’s tape, wide rubber bands, and recycled newspaper.

Spray painting outdoors is of course your best bet for ventilation and cleanliness. Stake some recycled newspaper in the yard to spray against as your canvas’s backdrop. Use the painter’s tape to tape off sections to not paint and keep the bright orange skin showing in your finished design. You could run a tape line across the middle of the pumpkin, cover the pumpkin’s top with extra newspaper, and tape that down over your first tape line. Spray the bottom half of the pumpkin with your desired spray paint color and allow it to dry completely according to the can’s instructions. Only remove your newspaper and tape lines once the paint is totally dry. Now you have a fresh half-and-half design. On a more slender pumpkin, wrap a handful of wide rubber bands around the body in an overlapping, sporadic fashion. Cover the stem completely in painter’s tape. Spray the pumpkin with paint and allow it to dry. When you remove the tape and rubber bands, you have just a few slices of orange showing through. Your options are really limitless with designs: stencils, stickers, and freehand application of painter’s tape could construct an array of styles.

One evening craft project could elicit weeks of head turning decorations to impress dinner guests and trick-or-treaters alike. Arrange your painted pumpkins as a centerpiece along the dining room table, buffet, foyer table, porch bench, or front steps. And consider pumpkin painting an early treat for yourself.

DesignInMind column; appeared in the Valley Morning Star October 16th.


Monday, October 10, 2011

Pumpkin Puree Soiree

We like to see pumpkins aplenty this time of year. And tasting them ranks pretty close to the top of the list as well. If you set aside the can opener, go for the gusto, and play with fresh pumpkins in the kitchen this month, you may find a whole new appreciation for how you can design this squash fruit to be more than an autumn staple.

Many pumpkin recipes can get started through baking whole pumpkins at home. It’s important to wash the exterior before cutting in. Carefully cut the pumpkin in half, slicing down through the top. Scrape out the fibers and seeds, leaving the smoother flesh. You can bake the halves or go on to quarter the pumpkin pieces, and lay them skin up on a baking pan. Bake at 400 degrees for about a half hour, or until the flesh is fork tender. Let the pieces cool, and then scoop away the flesh from the rind. To puree, add the pumpkin flesh into a food processor and blend until smooth. Now doesn’t that sound tastier than the canned version? Your fresh pumpkin puree can be used in your favorite pumpkin pie recipe to start. Or branch out and consider recipes for pumpkin pancakes, muffins, cake, or bread loaves. For more variety, cream cheese, marshmallow crème, cinnamon, and pumpkin puree combine to make a sweet seasonal dip.

Pumpkin soup can be a savory or sweet hot dish that puts a spin on the typical uses. Find recipes that call for ingredients like chicken broth, garlic, thyme, and sautéed onions, or take a different route with heavy cream, diced apples, brown sugar, and cinnamon. Add in your creation as a separate course for a weeknight dinner to make it anything but an ordinary weeknight dinner.

Leave the can opener in the drawer, pull out the baking dishes, and draw on the spice notes of the season to whip up some rich and flavorful specials to serve for any meal, brunch, or soiree you host for friends and family.

DesignInMind column; appeared in the Valley Morning Star October 9th.

Monday, October 3, 2011

Fall at Your Front Door

October has arrived, and holiday guests knocking at your front door is just weeks away. Beyond sprucing up your dinner table with some seasonal touches, dress your front stoop to be inviting and visually appealing with warm fall decorating ideas. Visitors will know they are in for more than a treat when they cross the threshold.

Simple and fitting, you cannot go wrong with a collection of pumpkins and mums. The bright blend of orange and yellow sets the tone for autumn appeal. Two larger, potted mums flanking your front door with a handful of pumpkins in varying sizes clustered around them is complete in minutes and will last for weeks. Now carving any pumpkins this early in the month will have you replacing them before four weeks are up. But you know we can always get more creative than that.

For the same effect without the mess, consider what paint can do on the exterior of pumpkins without taking a knife to them. Use a stencil, which you can print and cut out yourself, of your family’s monogram letter, and spray paint the sizeable letter on the largest pumpkin in your grouping. The same could be done with limitless designs, short sayings like “Welcome,” and graphics to suit your style. For a custom pumpkin collection, you could actually spray paint your entire pumpkins in one monochromatic selection or a couple of paint color choices, including light-catching metallics. There are more pumpkin painting ideas for indoors coming later this month!

In the process, do not neglect your front door itself. A wreath can be the crowning jewel to your entryway. You can purchase a ready-to-go wreath and hang it on a door hanger, or you can make your own for a custom look. Start with a plain dried naturals wreath, which is essentially a ring of tightly-woven, vine-like branches. Add on the decorations you want, using a glue gun for the most secure hold. Take all of the leaves off of a faux fall leaf garland, and glue them on individually in clusters. The same can be done with small acorns, gourds, sprigs of berries, or other fall trimmings.

Lay out a fresh welcome mat, and await that first knock or door bell ring that culminates in a compliment to your inviting entrance. You know that special holiday moments are right around the corner when you have fall literally at your front door.

DesignInMind column; appeared in the Valley Morning Star October 2nd.

Monday, September 26, 2011

A Warm Front

We may not have hit our seasonal stride with a welcoming cool breeze blowing in from the north just yet, but trying to enjoy your own fall feel just has to start with a warm front. Warm tones can be incorporated in your design style this season and still meld nicely with our local temperatures. It is all about picking and choosing the right simple fall updates for your living space.

Soften your sofa with a chenille throw draped over the arm or over the center of the back in a shade that compliments your fabric or leather but picks up on a crisp fall feel, such as a dark khaki, chocolate brown, brick red, or olive green. Tuck your accent pillows into a linen closet and replace them through November with warmer colored options that play up more earthy details, like wooden toggles over glittery sequins. Store away your placemats around the dining table for now and incorporate more textured versions with wood beads or stone pieces, or choose chargers for each place setting in gold, chocolate, or another warm metallic finish.

Faux flower arrangements can be put away in storage cabinets, and their spots can be replaced with any decorative piece that features something from the dried naturals’ aisle of a craft store. This could be a bunch of branches, curly willow, or spray painted mesquite limbs in a vase or decorative container, as well as a bowl of dried natural ball decorations that are entwined pieces or that have items like beans, coffee, or dried berries lacquered to their surface. Any brightly-colored candles can be stored away for spring, and clean white or cream tapers and pillars can take their place in a centerpiece, display, or fireplace arrangement.

Little swap-outs can take your space from hot summer to cool fall with some warm additives tossed in. Raise the temperature on the tones of your fabrics, linens, and decorations to create your own seasonal ambience inside your home, no matter the temperature outdoors.

DesignInMind column; appeared in the Valley Morning Star September 25th.

Monday, September 19, 2011

A Touch of Fall

So we may not have the crisp shades of fall drifting down to the ground in the form of leaves falling from our . . . mesquite trees. Let’s face it; the fall season here in the Valley may be missing those season-turning visuals that envelop other parts of the country. But that does not mean we cannot enjoy them just the same . . . indoors.

If October feels more pumpkin-y to you, then tap into some décor items fit for the start of fall in September. You cannot go wrong with traditional staples like leaves in warm red, orange, and brown shades and prickly pine cones. Take a fall leaf garland and remove the leaves from the plastic vine (just throw that away) to spread the leaves throughout a display on your dining table, buffet, or coffee table. Tuck a few leaves under the edge of the charger at each place at the table or under a short stack of books on your coffee table. Let a handful of leaves peak out between displays of white serving pieces on your buffet. Fill a staggered series of glass vases, whether cylindrical or square or a mix of both, with pine cones in different sizes and let them stand alone as a striking centerpiece that runs the length of your dining table’s center.

Think beyond the stereotypical fall decorative items and add in your own creative touches to soften the summer feel that has wafted through your home the last few months. Layer in coffee beans, mixed nuts in the shell, and river rocks in glass vases or pedestal bowls and set them on the foyer table, kitchen bar, or bathroom counter. Let a similar mix anchor a bunch of curly willow or dried branches in a tall cylinder vase on the kitchen island or a side table. Similar collections can be filled with dried cranberries, small gourds, green apples, dried corn or candy corn, wine corks, pears, acorns, and artichokes.

Pick your pumpkins next month. For now, enjoy your own indoor blend of cooling down and warming things up with those first touches of fall with your own style in the mix.

DesignInMind column; appeared in the Valley Morning Star September 18th.

Monday, September 12, 2011

The Beauty of Remembering

Today, our nation honors the lives lost and the great sacrifices of so many as we look back on the impact of the events of September 11th a staggering decade ago. It is likely that you remember exactly where you were and how you felt in the instant you learned of the tragedy that was unfolding in New York City that day. These types of memories make great impacts on us as pivotal moments in our personal history. Honoring any great losses in our lives as a way to respect and remember loved ones is a part of healing as we pay tribute.

There are so many special, small ways in which to acknowledge the influence on us of special people we have lost. Some plant tribute gardens or trees and mark them with placards. Even planting distinctive potted plants or a windowsill herb garden and adding a framed photo alongside of a relative or friend who has passed is a way to acknowledge them as you tend to and watch your plants thrive.

Adding a fixture to your garden, porch, or home that represents a special person is another way to pay tribute. A bench in a garden could be a memorable way to reminisce over a parent whom you spent time there with. A rocker or swing on your front porch could illicit memories of a grandparent you miss. Taking a piece of furniture, a chair, or a decoration with some family history and using it in your own home keeps part of their history alive with your own family. You could paint an old chest of drawers and add new hardware or reupholster a side or dining chair to make it fit your style while keeping its original frame displayed. An aged mirror from a relative’s dresser could be lacquered in a new finish and rest on your mantle for a fresh look with a story behind it.

Photo books made through an online company are another distinguished way to preserve the moments that were captured in stills over the years and can be displayed on your coffee table or bookshelf. A photo collage hung in matching frames in a hallway or on a dining room wall can be a blend of memories from many years ago with the activities of your family now.

Ultimately, displaying something that has meaning for you is a way to celebrate the life of someone who you held dear. Whether it is based on a funny memory or story or is a simple gesture of remembrance, filling your home with tokens of love and life adds meaning to yours.

DesignInMind column; appeared in the Valley Morning Star September 11th.

Monday, September 5, 2011

The Modern Birthday Party Theme


We have likely seen the glittery examples of the child’s birthday party of years past that just had to center around a super popular theme of a character or movie or television show, and all the accessories, from the paper plates to the party favors, had to feature this trademarked image. For today’s parent who may prefer not to scoop up an entire aisle’s contents at the party store for their next soiree, there are a boat load of creative themes to implement through a little imagination and eye for design.

First, consider what all your child is into, from colors to activities to hobbies to general interests. From this list, you can find a wealth of information to start to build the look of your custom birthday party. I say, the more consistently a theme is carried out, the more impact you get for your investment. And it all starts with the invitation. You can use an online company to print your invitations, or you can get hands-on with a computer program and have a local company print your finished picture file. Use your invitation to give guests a peek at what they can expect and entice them to your unique event.

A color being a theme is perfectly acceptable. Everything hot pink or a nautical combo like navy and aqua in your serving spread, decorations, and cake design is a theme in itself. Monochromatic or two-toned pieces together are very visually appealing and draw attention. Other themes that fall outside the character-featured norm that can really craft a catchy modern theme are things like trains, safari animals, robots, fish, gardens, boats, princesses, sea creatures, classic toys, surfers, barnyard animals, birds, butterflies, mermaids, bumblebees, frogs, elephants, and zebras. Use their colors, patterns, or silhouettes in your linens or paper goods, food labels and signs, and trendy cupcake fondant toppers and takeaway gift packaging.

Another essential element of any party is of course the food. Really jazzing up your display is like a gift in itself for your guest list. Whether you are serving pizza, sandwiches, burgers, hotdogs, or finger foods, be sure to add plenty of side items in small quantities to incorporate more visual impact and tummy-satisfying treats. Think breadsticks standing in glass cylinder vases alongside an abundance of dipping sauces, French fries in scrapbooking paper cones, or short juice glasses with carrot and celery sticks standing in a dollop of dip. Presentation really can be everything in laying out an inviting buffet. And when it comes to kids, you cannot go wrong with candy. Glass apothecary jars with brightly-colored treats to match your color selections are ideal for grab-and-go goodies and decorative flair.

Whatever you do, ensure a birthday party is always a celebration that makes the one blowing out the candles truly feel like they already got their wish.

DesignInMind column; appeared in the Valley Morning Star September 4th.


Monday, August 29, 2011

New Heights with Drapery Panels

Drapery panels can feel like an architectural feature in a room when hung to highlight the ceiling height and provide symmetrical frames to your light-infusing windows. If right-out-of-the-package panels have left you feeling less than thrilled with your retail fabric options, contemplate the alternatives to create customized panels that suit your home and your unique style.

You can choose from options beyond drapery panels by looking at the extensive selections of flat bedding sheets, fabric shower curtains, and fabric by the yard. For any of these options you may choose, you can buy extra to make throw pillows to match to add to your seating or bedding. Why limit yourself? Flat bedding sheets are wide enough and long enough for billowy, drama drapes, and they come in so many colors and styles. You can match or blend with your actual bedding to carry out the design. Fabric shower curtains similarly provide plenty of width and height and bold patterns and prints. Fabric by the yard is a great option for someone who is handy with a sewing machine to finish off a hemline. And fabric by the yard can easily create tall drapery panels that can be hung from a level just below the ceiling line to add height and sophistication to the look of your room. When hung correctly, they can all look professional in place.

That starts with the right hardware. My preference is a rod mounted above the window frame or at the ceiling line with two or three simple hardware mounts that the rod rests in. The size and style selections are wide-ranging from thin metallics to larger wood or iron rods with a slew of end cap finial styles. Pair this with sets of ring clips to accommodate the width and weight of your panel. Each ring slides onto the rod, and its attached clip holds a pinch of the fabric. This completely eliminates the need for those dated, hard-to-operate, thin, metal pieces you had to slide through tight pockets sewn into the drapery panels and then struggle to affix to their mounting hardware. Instead, update to a modern version for both ease and style.

Think outside the drapery aisle to find fabric panels that can act as art and décor in your living space. From vivid shades to strong graphic or geometric prints, you can add texture and personality, panel by panel.

DesignInMind column; appeared in the Valley Morning Star August 28th.


Tuesday, August 23, 2011

The Dish on Organizing Recipes

A recipe box stuffed with random, handwritten pieces of paper and online printouts alongside stacks of outdated, mix-matched cookbooks is not fully conducive to creative, productive time spent in the kitchen. Every family has their favorite recipes that are handed down from generation to generation and those popular dishes that are craved each holiday. To ensure your special collection stays intact and easy to retrieve, give your recipes a makeover of their own before the next holiday season starts to cook.

Add some order to your storage system. I recommend moving away from recipe cards and getting your go-to recipes in 3-ring white notebooks with clear view covers and spines for inserting labeled sheets. This helps eliminate the free-floating factor that can cause cards to be lost or quickly disorganized. Type out the card contents on full sheets of paper and include picture references when possible. You can use one larger 3 inch notebook and use dividers to separate and label your categories. Or for larger collections, use 1 inch or 1 ½ inch notebooks for individual categories. Consider using the labels “Appetizers,” “Soups & Salads,” “Vegetables & Side Dishes,” “Main Dishes,” “Meats,” “Breads,” “Desserts,” “Cookies & Candy,” or any detailed categories that would suite your set of recipes, like “No-Bake Desserts,” “Pies,” or “Beverages.”

Another important step in organizing a recipe collection is pairing down. Have you found recipes, tried them out, and then decided they didn’t make the cut for your family’s tastes? Throw those away. Organized and stored recipes should be made up of the ones you intend to use repeatedly. Use a plastic document case or an expanding file folder to pull together internet recipes or recipes torn out of magazines or off of product packaging. Only add them uniformly to your main collection if you have tried them and decided they are worth making again. A similar principle applies to cookbooks. They can stack up over the years and may just be taking up shelving space if you only really use a few recipes continually out of a book. Make photocopies of those applicable pages and add them to your notebooks. Then donate the cookbook or pass it on a relative or friend. They may find all new kitchen treasures inside.

Tackle your boxes or piles of recipes and turn them into a well-oiled kitchen machine right at your fingertips that can produce tasty dishes again and again. Do it with style if you use decorative scrapbooking paper, contact paper, or even leftover wallpaper in your finished product, and you have added a little flamboyance to your flambé.

DesignInMind column; appeared in the Valley Morning Star August 21st.